Showing posts with label vegan. Show all posts

Sunday 26 August 2018

#Foodie: 3-Ingredient Peanut Butter Cups


The Food Edit:


So, here’s the thing: the heavenly marriage of peanut butter and chocolate has long been celebrated in the form of Reese’s Peanut Butter Cups. But there’s a catch— those salty, sweet, devilishly moreish treats contain some real interesting characters. Here’s a list, just because. Ready?
  • Milk Chocolate (Sugar, Cocoa Butter, Chocolate, Nonfat Milk, Milk Fat, Lactose, Lecithin (Soy), PGPR Emulsifier)
  • Peanuts
  • Sugar
  • Dextrose
  • Cocoa Butter
  • Contains 2% or Less of: Hydrogenated Vegetable Oil (Palm Kernel Oil, Palm Oil), Salt, Palm Kernel Oil, PGPR Emulsifier, TBHQ and Citric Acid to Maintain Freshness [stats courtesy of Walmart]


We’ll leave you to take what you will from this, but allow me to highlight one item from the above list. Palm oil is problematic at best. I’m sure the whole orangutan/deforestation/palm oil debacle hasn’t passed you by. We won’t go into it now, but if you’d like to find out more about palm oil, take a look at this article published by One Green Planet, or this blog post by The Green Vegans, who reckon boycotting the product is actually counterproductive...


And on to our amazing recipe! As a long-time fan of the peanut butter cup, this was one I just had to try. And let me tell you, it was more than worth it. If the luxurious sheen of melted chocolate being drizzled onto little peanut butter plateaus weren’t enough, imagine the gentle crack of the chocolate once it’s firmed up, giving onto a little pocket of paradise: a smooth, buttery filling. But I’m running away with myself.


Image


This recipe makes between 15 and 25, depending on the size of your mini cupcake cases.


Ingredients:
  • 200g (7oz) good quality dark chocolate, melted
  • 125g (1/2 cup) smooth peanut butter (no added sugar, if possible)
  • 40g (2 1/2 tbsp) honey or other sweet syrup, added to taste
  • Pinch of salt, if your peanut butter doesn’t have any added
You’ll also need
  • your 15 cupcake cases (paper or silicone work well). I used paper cases which were about 1 inch across the top, and I got 25 out of the mixtures.  


Method:
  1. Fill a small cupcake liner with the melted chocolate to the top, then turn the liner upside-down and allow the excess chocolate to drip off. Repeat with the remaining cupcake liners, and place them onto a baking sheet.
  2. Freeze the chocolate coated cupcake liners for ~5 minutes, then repeat the procedure (filling the liners with chocolate and letting the excess to dip off), making sure that the sides of the cupcake liners are well coated with the chocolate.
  3. Freeze again for ~5 minutes.
  4. In the meantime, mix together the peanut butter, maple syrup (or honey) and salt (optional).
  5. Fill the firmed up chocolate coated cupcake liners with the peanut butter filling, smoothing out the top. Leave ~1 mm space at the top for the chocolate layer.
  6. Spoon some melted chocolate on top of each filled chocolate cup, so that you get a smooth, even peanut butter cup top.
  7. Freeze for at least 1/2 hour to allow the chocolate to properly set. Then, peel off the cupcake liners and enjoy!
  8. The homemade peanut butter cups keep well in a closed container in a cool dry place (or the fridge) for ~1 week, or in the freezer for ~1 month
Go forth and create! Let us know how they worked out for you, or go to the original page on The Loopy Whisk where this recipe was originally published. There’s lots of other really yummy things you can have a crack at!


Saturday 28 July 2018

Bio-D - (D for Dauntless, Dazzling, Delightful...)


Bio-D 
(D for Dauntless, Dazzling, Delightful...)

Bio-D has been around for a whilesince 1989 in fact—and there's never been a more appropriate time for them to step into the limelight. We need brave pioneers to lead the way to greener squeaky-cleanness! 


On their website, Bio-D describe themselves as being "committed to making cleaning products that don’t cost the earth, and to helping consumers contribute to a healthier, more sustainable planet". Hear hear! 


Right now, pressure is building on brands in all areas of commerce to improve their accountability and demonstrate their ability to commit to ethical and ecological practices. Bio-D have been at the head of this movement for years: all of their products are made in the UK, by people who are treated with dignity, with traceable ingredients of natural origin. They also hold a Cruelty-Free International accreditation. How's that for ethical practice?!


It's all very well to know where your products come from; it's quite another to decide whether they're good for you or not. It's become apparent in recent years that often customers are mislead by brands claiming their products are 'good' for them, when really the opposite is true. Ultra-fragranced, chemical-laden cleaning products can cause health concerns or allergic reactions rather than eliminate them. No such story here! Bio-D's range is 100% hypoallergenic. 


Despite the numerous obvious benefits of buying more ethical cleaning and care products from brands such as Bio-D, many people voice concerns when it comes to the cost. Well, how about this: would you put a price on your well-being? How about the well-being of the planet? Many commercial household products contain pollutants as well as irritants. 


There are lots of shops now around the UK where you can buy refills of your favourite eco-friendly brands for far less than you bought the original product for. This reduces the amount of empty containers put into landfill and encourages us to engage with the idea that we can choose what effect we have on the environment, whether negative or positive. 


And what do Bio-D actually make? Anything from washing-up liquid and laundry detergent to glass cleaner! We at Madia & Matilda have started to refill our in-shop washing-up liquid and hand soap with Bio-D, and take it from us: it cleans nicely, smells good and gets the job done! Our favourite is the lime and aloe vera sanitizing handwash. It smells of lime Jelly Babies! 


Keep an eye out for our upcoming competition with Bio D, as you could be in for a chance to win a 5 Ltr bottle of Laundry Conditioner! 


Sincerely Madia & Matilda

Sunday 19 November 2017

Sustainable Christmas

Happy Sustainable Christmas!

It’s a well-known fact that we all enjoy indulging ourselves a little more than usual at Christmas – whether it be by buying our loved ones more gifts planned, treating yourself while Christmas shopping (cos that shizzle is exhausting!), or having to unzip your jeans after dinner. But spoiling ourselves this season does not mean we need to spoil our planet too.

Here are a few tips to help you enjoy a sustainable Christmas this year. Challenge accepted? 

1) Sustainable Christmas Trees

Christmas is a massive tree brushing the ceiling of your living room, adorned with glittery baubles and lights and memories of Christmases past, right? Doesn't have to be! Why not try an artificial tree for a more Sustainable Christmas – these can be bought from most shops and last on average up to 20 years.


Not only that, but they come in all shapes and sizes – for example, there is the classic artificial tree, but also more unconventional trees such as this stunning steel tree above. Stick it away in the loft when January rolls around and re-use every year!


Another option for a sustainable Christmas tree would be to rent one! Yes, you read that right. There are now companies all over the UK, such as Forever Green, Christmas Tree Rentals, or Living Christmas who specialise in growing Christmas trees in pots. You simply order yours, they deliver it and you water it every day. Then, come January, the company comes to pick it back up and look after it all year until it gets rented again the following Christmas. The benefit of this is that trees are not simply being planted to be chopped right down again come Christmas time. Here at M&M, we think renting Christmas trees is a pretty great idea and will certainly be renting ours from now on!


2) Eco-friendly decorations


There is nothing prettier than an autumnal wreath on the front door at Christmas time and our friends at Fleur de Rue in Stroud Town Centre are selling the most stunning wreaths that would look amazing in any home this winter!


Why not pop down to their stall and have a little nosey for yourself at their beautiful pieces?


3) Recycle your tree!

You do not have to rent a tree or buy a fake one to be sustainable this Christmas. Make sure to recycle your tree when Christmastime is over and ensure you're not contributing to the 90% that end up in a landfill. For advice on recycling your tree, simply call your local council.

4) Send e-cards


Not in the mood to handwrite hundreds of Christmas cards this year? No worries – check out how to create an e-card and then email them to your recipients. The process takes minutes and all your cards can be sent at the same time – saving you time and effort, which means more time to get into the Christmas spirit with your family and save trees in the process! Win-win! Or a voucher from us, now what's not to love! 

5) Why not try a Vegan Christmas dinner?


The Vegan Food and Living website has some incredible Christmas meals and snacks to try. What's to stop you from updating your Christmas dinner, whilst still allowing for tradition? Check them out now for stunning and simple recipes such as Vegan Christmas Pie and Vegan Tofu “Egg” Nog and enjoy a sustainable Christmas dinner.
6) Eat your leftovers!
Boxing Day's leftover-sandwiches are a great part of the season's culinary offerings. Ensure to make your Christmas leftovers last and avoid throwing away good food this Christmas instead of binning your food remains. Books such as Love Your Leftovers from Friends of The Earth are a great way of doing this, but failing that, it might be an idea to donate your leftovers to your local homeless shelter. For some, it may be the only Christmas dinner they will get this year and you will be helping to cut down on global food waste whilst making someone feel loved. Is that not what Christmas is all about?!


However you choose to spend Christmas this year, we hope this has been of some help to you in having a more sustainable Christmas! All of us at M&M would like to wish you a very Merry Christmas and A Happy New Year and thank you for all your support this year.
Sincerely Madia & Matilda

Saturday 30 September 2017

#Foodie - Sushi Making Ideas


Homemade Vegan Sushi Rolls are a healthy and economical way to enjoy sushi, using vegetables instead of seafood. These amazing recipes produce the an incredible taste, and at a fraction of the cost of seafood sushi. Give it a go, we dare you!


Basic Sushi Recipe

You will need:
Nori sheets (made from dried seaweed)
2 cups white rice (medium grain)
120ml water
3 Tbsp rice vinegar
3 Tbsp sugar
1 Tbsp mirin
2 tsp salt
1 cucumber, cut into strips
1 red bell pepper, cut into strips
1 carrot, shredded
1 avocado, cut into strips
Soy Sauce for dipping
Thai Sweet Chile Sauce for dipping
Toasted sesame seeds, to garnish

Method
  • Thoroughly rinse rice until water runs clear
  • Cook rice according to packet instructions
  • Let rice cool completely, and transfer to a non-metallic bowl
  • Mix vinegar, sugar and salt until dissolved and pour into rice
  • Gently mix rice to incorporate seasoning
  • Prepare veggies by cutting them into strips
  • De-seed cucumber
  • With rough side of the nori sheet facing up, spread the rice to a thickness of about 1/2 an inch. Leave the top 1" off the Nori sheet bare
  • Layer veggies on the bottom of the Nori sheet. Then, with a mat or towel, carefully roll up the sheet so all the veggies are rolled up firmly inside
  • Slice with a wet knife
  • Season with sesame seeds, if you desire
  • Use soy sauce or sweet chilli for dipping
Makes approximately 24 rolls


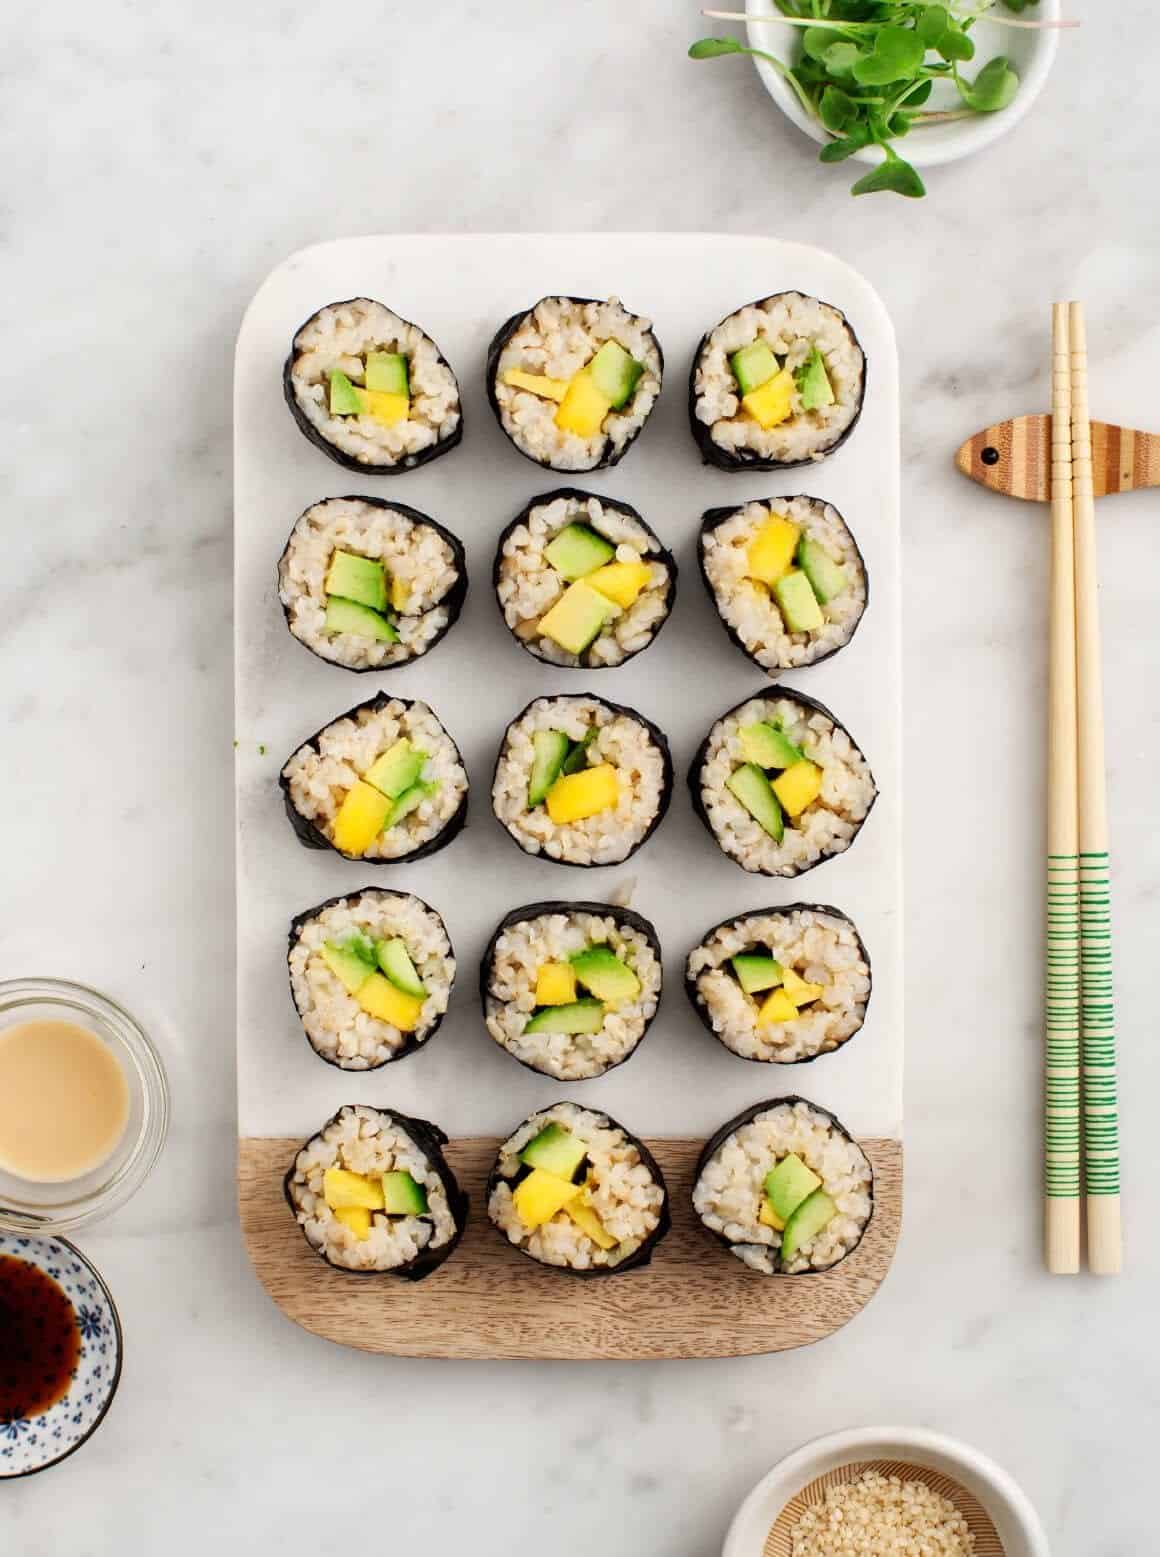
Avocado & Mango Brown Rice Sushi
Serves 4
You will need:
for the rice:
  • 1 cup short grain brown rice, rinsed well
  • 2 cups water
  • 2 tablespoons rice vinegar
  • 1 tablespoon sugar
  • 1 teaspoon sea salt
for the rolls:
  • 1 cucumber, sliced into long strips
  • 1 ripe mango, sliced into vertical strips
  • 1 avocado, sliced
  • ⅓ cup micro greens, optional
  • 2 tablespoons sesame seeds, optional
  • 4 nori sheets
serve with:
  • tamari or ponzu sauce
Instructions
  1. Combine the rice and water in a rice cooker and cook on the brown rice setting. If you don’t have a rice cooker, combine the rice, water and 1 teaspoon of olive oil and bring to a boil. Cover, reduce heat, and simmer for 45 minutes. Remove the rice from heat and let sit, covered, for 10 more minutes. Fluff with a fork.
  2. Meanwhile, in a small bowl, combine the rice vinegar, sugar and salt. Heat it in the microwave for a few seconds to allow the sugar to dissolve.
  3. Prep the filling ingredients for the rolls and set aside.
  4. Transfer the rice to a large bowl and pour in the vinegar mixture. Use a spatula to gently fold in the rice until the mixture is fully incorporated. The rice will start to look glossy. (Traditionally, you fan it to cool it while doing this)
  5. Place a small bowl of water and a kitchen towel near your work area as your hands will get sticky. Place one nori sheet, glossy side down, onto a bamboo mat and press a handful of rice onto the lower two-thirds of the sheet. At the bottom of the rice place your toppings (see picture). Don’t overfill or it will be more difficult to roll. Use the bamboo mat to tuck and roll the nori. Once rolled, use the bamboo mat to gently press and shape the roll. Place the roll to the side, cut side down. Repeat with remaining rolls.
  6. Use a sharp chef’s knife to cut the sushi. Wipe the knife clean with a damp towel between cuts.
  7. Serve immediately with tamari or ponzu sauce and coconut peanut sauce, if using.
This recipe is from a lovely blog called Love and Lemons: https://www.loveandlemons.com/
Avocado Mango Brown Rice Sushi


Sincerely, Madia & Matilda

Friday 18 August 2017

#Foodie - Veggie Noodles With Tomato-basil sauce


We all love a home cooked pasta dish, therefore with our new inspired meal ideas Madia & Matilda have prepared a dish we can all enjoy. 


Ingredients
1/2 tbsp (7 ml) olive oil
4   garlic cloves, pressed 
1 onion chopped up 
2 pkg (10.5 oz/595 g each) grape or cherry tomatoes
1 cup (250 ml) unsalted vegetable stock, chicken stock or chicken broth
1   large aubergine (eggplant for our American friends) , unpeeled
2 medium courgette
2 medium yellow squash
3/4 oz (20 g) fresh basil leaves, snipped
1/2 tsp (2 ml) each salt and black pepper


Directions:
Heat oil in a large pot over medium heat for 1-3 minutes or until shimmering. Add pressed garlic and chopped onion; cook for about 30 seconds. 
Add tomatoes and chicken stock. Cover; bring to a boil over a high heat.  
Reduce heat and simmer, covered, 6-8 minutes or until tomatoes burst. Gently squeeze any whole tomatoes with Tongs. Using grater or veggitable stripper grate vegetables into long strips, avoiding seeds. Stir vegetables into tomato mixture. Cook, uncovered, 3-6 minutes or until vegetables begin to soften, stirring occasionally. Finally stir in basil, salt and pepper. 
You will make enough, for 6 servings, enjoy.


Tips:
For variety, stir in any of the following in Step 4. 
• Fresh baby spinach • Cannellini beans or for our non vegan friends - Diced cooked chicken, Italian sausage.


                     Sincerely Madia & Matilda